Principle Exercises
This animation shows how using a cycle can be effective for movements such as a waving flag.
This animation shows the classic walk cycle.
This animation is exploring perspective.
This animation shows a running clycle.
In this animation I had to animate two balls of different weights, the first a tennis ball and second a bowling ball. I also had to show an inflated balloon. The purpose was to show how varying weights effect the movement of objects.
This animation a lift motion.
Style & Method Experimenting
Flash
This was an assignment set for the purpose of learning flash. However because I am already familiar with this programme I took the oppertunity to experiment with my style. Usually I would either draw a background or leave it plain white, in this animation I decided to see what effect I would achieve if I used a still image of a real field in contrast to the cartoony style animation. I like the effect it gives however the picture quality isn't the best.
LoFi Project
Puppet Stop Motion
For this exercise we were given the opportunity to make our own puppets for the stop motion animation task. I enjoyed the workshop and i'd like to explore puppet making more. We were given a basic armature to build onto. The puppets we created were simple and designed to fit thier purpose however with the overexaggerated length of his arms and legs and his oversized hands if animated right can hold a lot of character.


Pull Test 1
For the first pull test I used a spare puppet.
I was pleased with this as a test shoot but there are a lot of areas that needed improvement. I didnt put enough pins in the rock so it wobbles around when it should remain static to give the impression of its weight.
The movement could also be a lot smoother and I need to slow down the pace and vary the speed of his motions.
Pull Test 2
In this test I used my finished puppet.
I was pleased with the rock remaining static and solid until he pulls it in this shoot, I was also happy with the taughtness of the rope at the start of the pull.
The movement is still a little fast but the pace is better, I tried to get trembles in his arms, legs and the rope to portray the strain and the weight of the rock.
There are two different ocassions in this test when the camera was knocked out of place.
Final Pull
Lip Sync
We were asked to create a lip sync animation with a given voice lip. For lip syncing I use an extension called KeyFrame Caddy. The extension means that you can save preloaded keyframes for a symbol (i.e. a mouth symbol with keyframes of each different mouth movement).

Once all of the keyframes have been saved you can go back into the main timeline, add the mouth symbol into it, click 'Load Graphic' in the Keyframe Caddy window and all of the Keyframes from the symbol will apear in the window.


Now if you want to change the mouth pose you simply select which pose you want from the Keyframe Caddy window, click it, and it will create a new Keyframe in the timeline for you with the new pose on it.
You can also put tweens between two Keyframes that change pose, and at anypoint if you need a new keyframe that you haven't drawn in the symbol you can simply go into the symbol, create a new keyframe, draw the pose, go back to the main timeline and load the graphic again.
Maya Push
For this exercise we were asked to animate a rigged character pushing a block in Maya. I found this exercise the most challenging, i'm not at all familiar with Maya. It took me a while to get the hang of it and once I had it was still slow and tedios, think I'll stick to 2D...
Exploring Project Animation
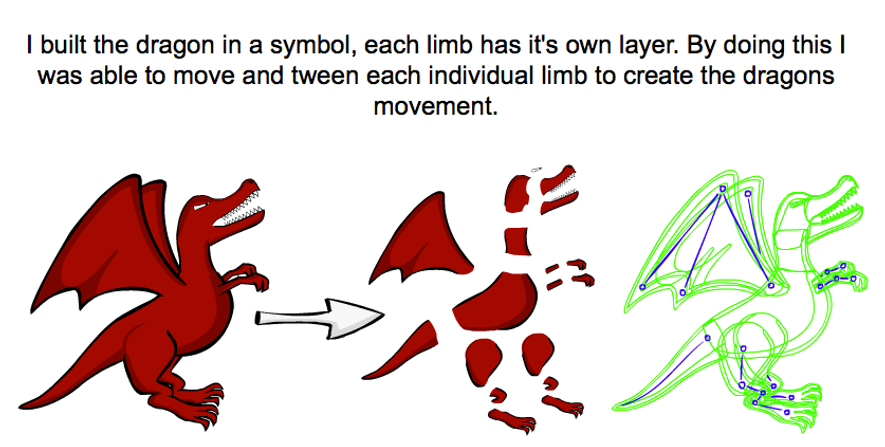
For this module we were set the task of animating a chase sequence between two characters. After changing the idea a few times I settled on a Knight character being chased through a video game by a dragon. I wanted a very 'video gamey' style with occasional cut aways to the computer nerd playing the game. The nerd character and background is more detailed and realistic to the knight and dragon to highlight the video game world.

I tried a few different designs for the Knights helmet. I liked the extra depth and texture added by the plume but didn't to take on animating it throughout. I don't like how the top middle, bottom middle and bottom right look, the bottom right would be difficult to animate because of the extreme protruding nose. My favourite designs where the bottom left and top right, overall I think the top right design works the best.
I decided to animate the plume being burnt off at the start of the animation to save time later on animating it's movement.


These are the different designs for the knight characters armour.
I tried out a much more basic, stripped back design for the first set of armour but thought it looked too much like a medieval peasant.
The second design I liked best because it looks simplistic enough not to be crowded but is still interesting to look at.
The third design I didn't like, I tried to make it more complex with many layers of armour but the result is too busy.
For my final design used the middle suit with the last armours darker shade. I wont be animating a shield or a sword.


Storyboard